

Have you ever found yourself in a situation where you wanted to copy text from an image on a website, quickly extract text from a slide in a video, or copy and paste the message from an error dialog that popped up during development to look it up? Normally, since you can’t highlight and select text in images, videos, or system dialogs, your only option is to type it out by hand.
However, using the built-in “Shortcuts” app on Mac, you can create a custom tool that captures a specific area via screenshot, automatically converts the text within it into editable text (using OCR), and copies it to the clipboard.
In this article, I’ll explain in detail how to create a “text extraction shortcut” that takes just a few minutes to set up—without using any external paid apps.
- Here’s why it’s great! Advantages over AI tools and dedicated apps
- How This Shortcut Works
- Steps to Create a Shortcut for Extracting Text from Images
- Assign a Keyboard Shortcut
- Real-world scenarios and specific usage
- Usage Precautions and Troubleshooting
- Summary: A Handy “Personal” Tool to Boost Productivity
Here’s why it’s great! Advantages over AI tools and dedicated apps
Recently, methods involving uploading screenshots to ChatGPT or Claude for transcription (AI-powered OCR) have become popular. There’s also the option to use paid apps like “TextSniper.” However, this shortcut—which leverages Mac’s built-in features—offers practical benefits that far surpass those alternatives.
- Overwhelmingly “Faster and Easier” Than Using AI:
When using AI for OCR, the process involves saving a screenshot, opening a browser, uploading the image, and waiting for a response—a time-consuming and cumbersome process. With this shortcut, however, all you need to do is press a key and select the text area. It requires no internet connection and copies the text to your clipboard instantly, in just 1–2 seconds. - “High accuracy” suitable for real-world use: Because it utilizes the text recognition
engine (Live Text) built into macOS, it achieves very high accuracy for both Japanese and English. As long as the image has sufficient resolution, you can copy every single character accurately. - Supports “Vertical Text”: Even “vertical Japanese
text” found in PDF book data or images of pamphlets is recognized accurately without any issues. After extraction, it is automatically pasted into the clipboard as natural text data (horizontal), saving you the trouble of formatting. - Free, lightweight, and secure: Since there’s no need to install third-party background apps
, it won’t slow down your Mac. Furthermore, all OCR processing is completed offline on the device itself, so you can safely extract text even from internal documents containing confidential information or error logs.
How This Shortcut Works
Once you set up this shortcut, you’ll be able to smoothly execute the following actions with a single click.
- 1. Press the shortcut key (e.g.,
Control Command 4etc.) - 2. The screen dims and enters “Selection Mode,” similar to taking a screenshot on a Mac
- 3. Drag to highlight the area from which you want to extract text
- 4. The image data of the selected area is processed, and the text is automatically converted to text
- 5. The text is saved to the clipboard, and a Mac notification appears saying “Copied”
There’s no need to save the image or launch a separate app. You can simply paste it directly into Notes or a text editor to use the text.
Steps to Create a Shortcut for Extracting Text from Images
Now, I’ll walk you through the step-by-step process of creating this recipe using the Shortcuts app.
If you find creating it tedious, you can also import the shortcut I’ve created.

1. Launch the Shortcuts app and create a new shortcut
Open the Shortcuts app from Mac’s Launchpad or Spotlight Search (Command Space). Click the “+” icon at the top of the screen to open the New Shortcut screen.
Click the title bar at the top center of the window and change it to a descriptive name (e.g., “Copy Text from Screen,” “OCR Extraction Tool,” etc.).
2. Add actions and configure settings
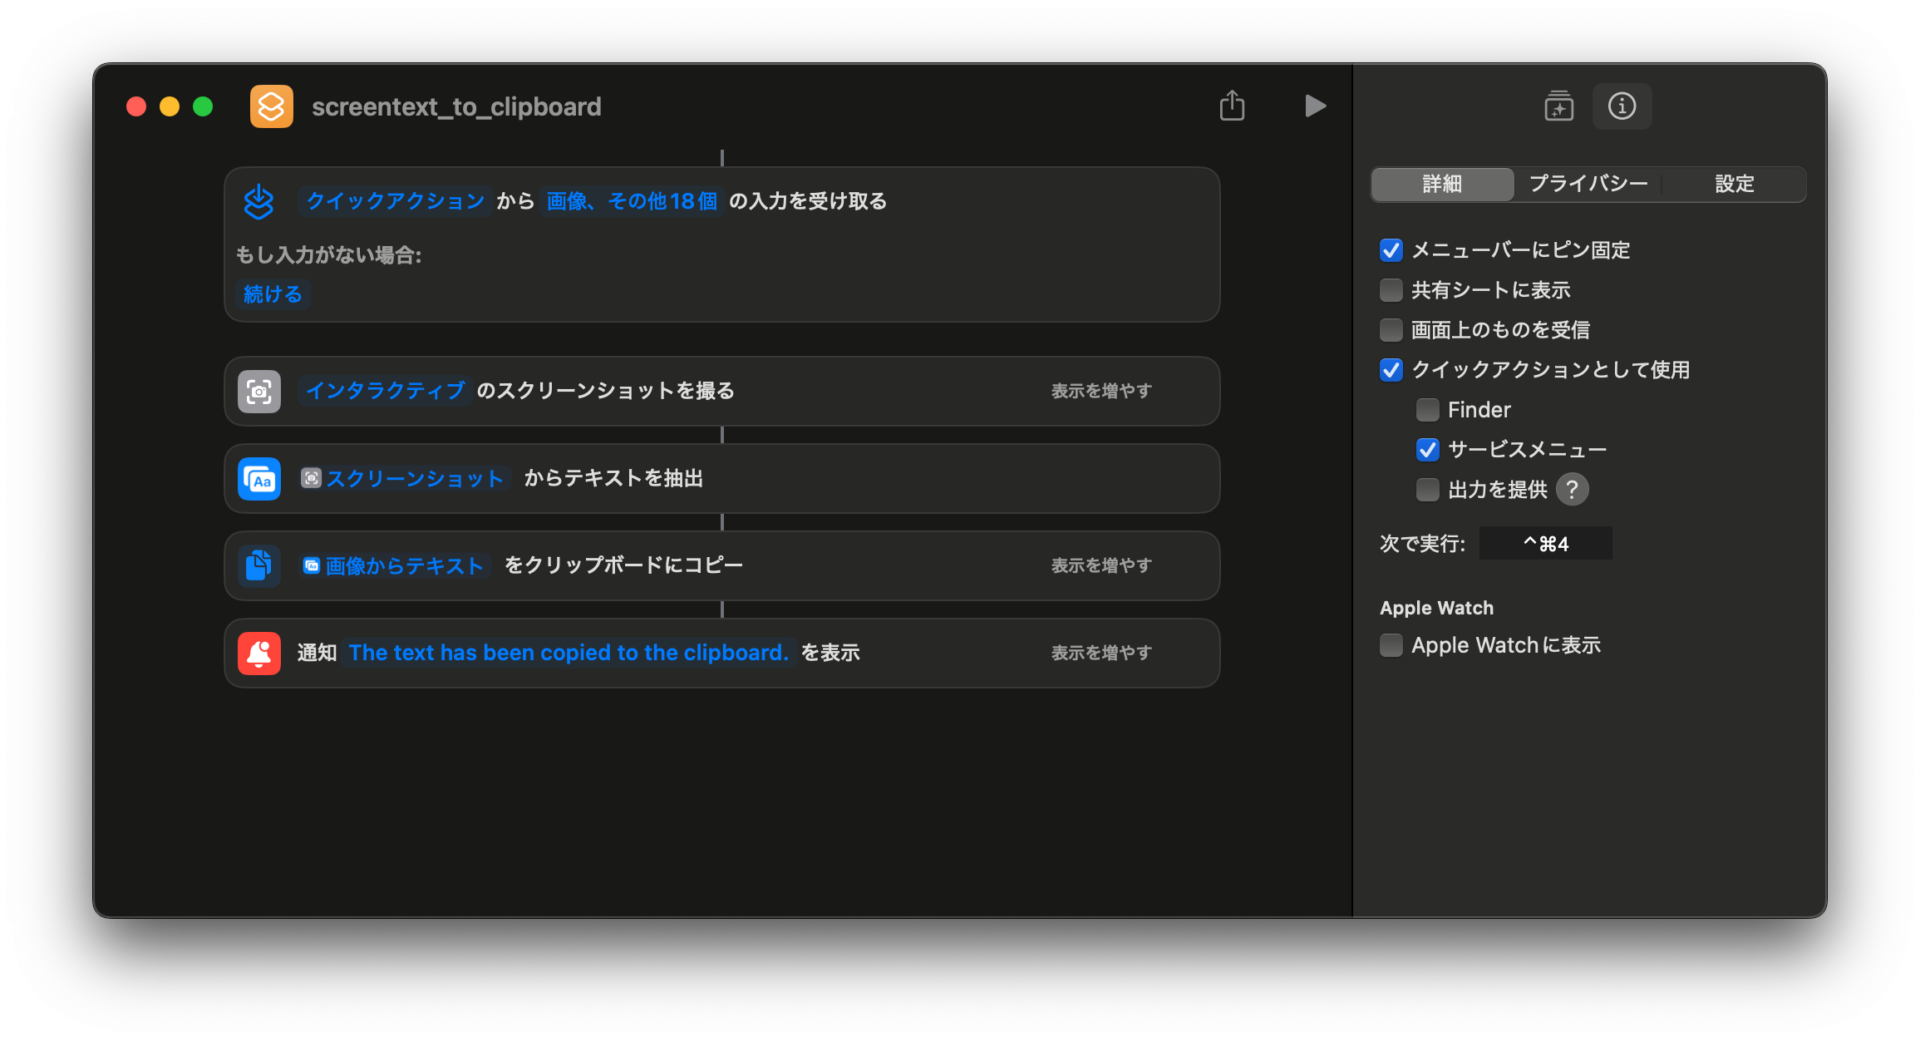
Use the action search bar in the sidebar on the right to add the four actions described below in order, and adjust their parameters.
Action 1: Take a Screenshot
Type “Take a screenshot” into the search bar and drag and drop (or double-click) it into the editor area on the left to add it. After adding it, change the advanced settings as follows.
- Click the section labeled “Full Screen” in blue text and change it to “Interactive.“
- Click “Show More” at the bottom of the action block to open the advanced options, and change “Selection” to “Custom.“
By setting these options to “Interactive” and “Custom,” you’ll be able to select any area with your mouse cursor when you run the shortcut, just like with Mac’s standard screenshot feature.
Action 2: Extract Text from an Image
Next, type “Extract Text from Image” in the search bar and add it directly below the action you just added.
- Once added, it will automatically pick up the output from the previous step and display something like “Extract text from ‘screenshot‘.“ If that appears, the setup is successful.
This action analyzes the text in the image and performs OCR.
Action 3: Copy to Clipboard
Next, search for “Copy to Clipboard” in the search bar and add it as the third action at the very bottom.
- If it says “Copy ‘text’ to clipboard,“ you’re good to go.
Now, the text data extracted by the previous action will be automatically saved to your Mac’s clipboard, allowing you to paste it anywhere (Command V).
Action 4: Show Notification (Optional/Recommended)
Since it’s hard to tell visually whether the process was successful if the text is just copied to the clipboard in the background, let’s add a setting to display a completion notification.
- Type “Show Notification” in the search bar and add it to the bottom.
- Click the message section, which says “Hello World” by default, and change it to a phrase that clearly indicates completion, such as “Text from the screen has been copied to the clipboard.“
With this, the main logic for your custom shortcut is now complete.
Assign a Keyboard Shortcut
There’s no point in launching the shortcut manually from the app every time. To ensure you can call it up instantly whenever needed, let’s set up a keyboard shortcut.
To assign a key, use Mac’s standard screenshot feature (Shift Command 3 or Shift Command 4) makes it easier for your fingers to remember and improves usability.
Steps to Set Up Shortcut Keys
- 1. With the shortcut editing screen open, click the “Settings button” (the icon that looks like the word “
[i]” in a circle) in the upper-right corner to open the details pane on the right. - 2. Click the “Add Keyboard Shortcut” button in the “Details” tab.
- 3. The input field will become active; press the key combination you want to assign on your keyboard. *As
an example, we recommend setting something likeControl Command 4(^⌘4). This combination is less likely to conflict with shortcuts in existing systems or other apps and helps prevent accidental presses.
Once you have entered the keys, you can move the focus away from the input field and simply close the window. This completes the setup.
Real-world scenarios and specific usage
Once the setup is complete, let’s test how it works. When you press the configured key (e.g.,^⌘4), a crosshair will appear on the mouse cursor and the entire screen will dim slightly. This is exactly the same behavior as when taking a screenshot.
Drag to select the area containing the text you want to copy, and when you release the mouse button, you’ll hear a “click” sound. Within 1–2 seconds, a notification saying “Screen text copied to clipboard” will appear in the top-right corner. You’re all set. Now, simply Command V .
Specific Use Cases for Practical Work
- Transcribing code from videos or webinars: You can quickly copy and paste sample code displayed on slides in programming tutorial videos or online seminars into your editor simply by selecting the range.
- Searching error dialogs: Those mysterious errors that pop up during development. Even if you can’t select text directly from the dialog, you can copy the text by selecting the area and immediately run it through Google or AI search.
- Extracting text from images: This is invaluable for quickly converting text from raster images embedded in mockups (e.g., Figma or XD) or PDF documents into HTML before you start coding.
- Taking notes during screen sharing: During meetings, you can quickly extract and save key points or URLs from materials shared via screen sharing directly to your own notepad.
Usage Precautions and Troubleshooting
While this tool is extremely fast and highly accurate, there are some limitations and precautions due to its underlying mechanism. Please keep the following points in mind when using it in a professional setting.
1. Be careful with spaces and line breaks
If you select text that spans multiple lines or is divided into paragraphs, unnecessary line breaks or extra half-width spaces may be included when the text is copied to the clipboard. After pasting, be sure to read through the text and perform a quick visual check to ensure the formatting is correct.
2. Limitations of highly stylized fonts
Images with extremely low contrast between the background and text, special handwritten-style fonts, or logos with overly decorative designs that distort the shape of the characters may not be extracted correctly as text.
3. Misrecognition of Similar Characters
Mac’s text recognition engine is excellent, but the following characters may be confused depending on the context:
- The uppercase letter “
I“i” and the lowercase “l(L)”, and the numbers “1(one) - The uppercase letter “
O“O” and the number “0(zero)”
If you encounter random character strings that look like passwords or have extracted exact source code, I recommend getting into the habit of double-checking them visually rather than taking them at face value.
Summary: A Handy “Personal” Tool to Boost Productivity
In this article, we explained how to create a custom OCR tool using “Shortcuts,” a standard app on Mac, to instantly copy text from images anywhere on the screen to the clipboard.
- 1. “Take a Screenshot (Interactive/Custom)”
- 2. “Extract Text from Image”
- 3. “Copy to Clipboard”
- 4. Optionally, “Show Notification”
Simply combining these few actions and assigning a keyboard shortcut will dramatically improve your workflow efficiency. Since this secure tool—which is faster than AI and supports vertical text and high precision—is available for free, I strongly recommend setting it up right away if you’re looking to boost your productivity on a Mac.
Comment